
There are few people in this country that don’t like a good pot roast. It’s almost as American as apple pie. Reading online however, pot roast seems to be difficult for some home cooks. Sometimes it’s bland, sometimes it’s dry, many times it’s both. I came across this version of pot roast in GQ magazine a few years ago and have yet to be disappointed. Instead of being a step by step recipe, it’s more like a method for getting deep, rich flavor that is perfect on cold fall or winter days. The key step, and one that many people leave out when they make a roast is browning the meat. Getting a good crust on the meat before roasting it is key to develop flavor. I could go all scientific on you and describe why it makes things taste good, but I will let my favorite food site, Serious Eats, describe the Maillard Reaction instead. Trust me, you want browned meat for great pot roast. In this method it adds about 20 extra minutes to the process, but the vast improvement of your roast when you get done will make up for the extra time. The rest of the method is variable depending on what you have on hand, what’s on sale at the store, or what your personal tastes are and that’s the beauty of it. I will show you where you can change things up and give a few alternatives along the way.
Start with a 2-3 pound roast that is 2 inches or so thick. I chose chuck roast for this but you can use any thick cut, rump roast, sirloin roast, even a rib roast. Take your roast and cut it into fist sized chunks, obviously if you have giant hands you can go a little smaller than fists. On my 2.5 pound roast I got 7 chunks. Generously salt all the sides of each piece, coarse salt is better here because regular table salt tends to go overboard on the saltiness.

Salted Fists
Let the meat stand at room temp after salting for 20 minutes or so. If you want, you can take the roast out and let it warm up before you salt and that way once you start in the kitchen you can keep going without the wait. Peel and cut up 3-4 average carrots into pieces about the size of a pinkie, thicker carrots can be sliced in half lengthwise, or use 3/4 of a bag of baby carrots.

Carrots
Roughly chop a large onion. Put the carrots and onions aside.

Carrots and onions
While the meat is resting, heat a heavy bottomed pot over medium high heat. I love my cast iron Dutch oven for this, but any 5-8 quart pan with a lid will do. Add a good glug of olive or vegetable oil, whatever you have on hand and let it heat up. When the oil is shimmering add some meat, leaving space around each piece. Usually you have to break it up into two batches to prevent overcrowding which doesn’t allow the Maillard reaction to occur.

Let the meat sear for 1-2 minutes per side until nicely browned and flip until you brown all 4 big sides of each piece. Take the meat out and set it on a plate and continue with the next batch. Take all the meat out of the pan and set the plate aside.

Results of the Maillard Rxn
Pour in about a half a cup of beer to the hot pan and stir rapidly with a wooden spoon scraping all the goodness stuck to the bottom of the pan. The beer will bubble and start to reduce. I like to use a bit of a darker beer than your typical light beer. A pale or amber ale are my choices for this but a Miller Lite will do to if that’s all you have. You can also use red wine, Coca-Cola, Dr. Pepper, or chicken broth with great results.

Add the onions and carrots and stir to coat with thickened beer. Add about a teaspoon of salt and a good crack of pepper and stir occasionally, cooking about 5 minutes. Reduce heat to low and cook 10 more minutes stirring occasionally until your onions and carrots get nice and caramelized (there’s that Maillard Reaction again).

While veggies are cooking, preheat your oven to 300. When the vegetables are done, set the beef chunks on top of the vegetables, throw in 2-3 unpeeled cloves of garlic (or don’t, your call), a couple sprigs of parsley (rosemary works too, or a teaspoon of dried parsley or rosemary, or no herbs at all, again it’s your call), and pour in enough beer to come about half way up the sides of the meat. I used 2 bottles of beer total today, so if you are using one of the alternatives that’s 1 bottle of wine, 2 cans of pop, or 3 cups of broth.

Put lid on pot and put in oven for 3 hours. Remove from oven, scoop out veggies and meat and put pot on a burner. Turn heat on to medium high and bring liquid to a boil, boil til thickened about 10 minutes. Serve by spooning “gravy” over meat. Dig in.
Final Product
Beer Braised Pot Roast
- 2-3 Pound Chuck Roast
- 3-4 Carrots, Peeled
- 1 Softball Sized Onion
- 2 Bottles Amber Beer (1 Bottle Wine, 2 cans of regular pop, or 3 cups chicken broth can be used instead)
- A sprig of parsley (or rosemary, thyme, or 1 tsp dried herbs)
- Salt and Pepper
- Olive Oil
- 2-3 Cloves Garlic
- Start with a 2-3 pound roast that is 2 inches or so thick. Take your roast and cut it into fist sized chunks. Generously salt all the sides of each piece. Let sit at room temperature 20 minutes while oven heats to 300.
- Peel and cut up 3-4 average carrots into pieces about the size of a pinkie, thicker carrots can be sliced in half lengthwise, or use 3/4 of a bag of baby carrots. Roughly chop onion and put vegetables aside.
- Heat a heavy bottomed pot over medium high heat. Add a good glug of olive or vegetable oil, whatever you have on hand and let it heat up. When the oil is shimmering add some meat, leaving space around each piece. It might be necessary to separate into two batches.
- Let the meat sear for 1-2 minutes per side until nicely browned and flip until you brown all 4 big sides of each piece. Take the meat out and set it on a plate and continue with the next batch. Take all the meat out of the pan and set the plate aside.
- Pour in about a half a cup of beer or liquid of your choice to the hot pan and stir rapidly with a wooden spoon scraping all the goodness stuck to the bottom of the pan. Let beer bubble and start to thicken.
- Add the onions and carrots and stir to coat with thickened beer. Add about a teaspoon of salt and a good crack of pepper and stir occasionally, cooking about 5 minutes. Reduce heat to low and cook 10 more minutes stirring occasionally until your onions and carrots get nice and caramelized.
- When the vegetables are done, set the beef chunks on top of the vegetables, throw in 2-3 unpeeled cloves of garlic (or don’t, your call), a couple sprigs of parsley (rosemary works too, or a teaspoon of dried parsley or rosemary, or no herbs at all, again it’s your call), and pour in enough beer to come about half way up the sides of the meat.
- Put lid on pot and put in oven for 3 hours.
- Remove from oven, scoop out veggies and meat and put pot on a burner. Turn heat on to medium high and bring liquid to a boil, boil til thickened about 10 minutes. Serve by spooning “gravy” over meat.
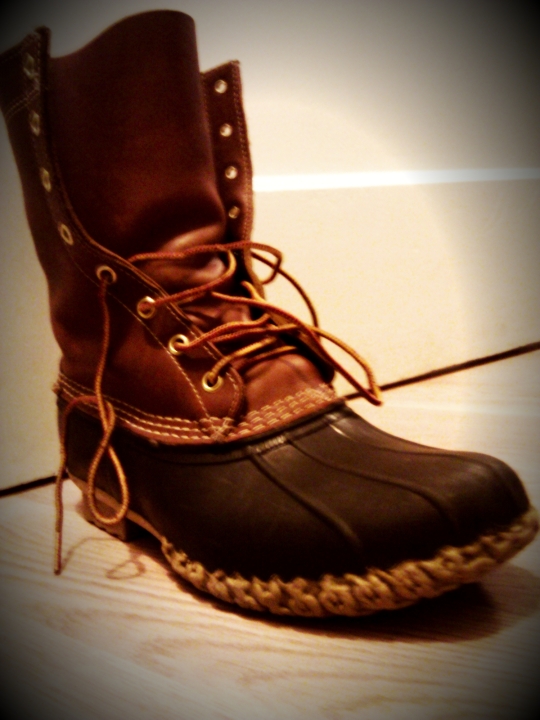 I am back. Both to the blog and to civilization. This weekend I went to one of the more remote places left in the lower 48 states: Porcupine Mountains State Park on the shores of Lake Superior. This is one of two annual trips up there with my dad, sometimes my brother, and our friends. The winter trip is a guys only affair, but women and girls can come in the summer, though most of the candidates opt out. Both trips involve relaxation and good times off the grid. Neither are true backpacking adventures since we rent rustic cabins, but it’s about as much roughing it we get for the year. We spend a few days with no electricity or running water, just hanging out and having a good time. I was looking forward to seeing lots of snow and being able to use the snowshoes I got for Christmas, but even up there the snow was pathetic and I was faced with trekking it through the woods in my Bean Boots. Leon Leonwood Bean was a genius for coming up with these boots. They are American icons and are the favored footwear in my closet anytime it is damp in winter, spring, or fall. I know some people even wear them with shorts in the summer, though I am not that adventurous. I received numerous comments on how goofy they supposedly look this weekend, but I know my feet were dry and comfortable in any condition they faced. Even with the lack of snow, it was as always, a great feeling unplugging from my phone, email, Facebook, and yes, this blog. It would be downright impossible for many people,but I think that everyone should take a chance to escape from technology for at least one day a year. It lets your mind slow down for a bit, because pretty much anything you want to get done has to wait until you get a connection back to the 21st century.


